Monday, May 18, 2020

Last Shelter: Players Guide - Dooms Day

Last Shelter: Players Guide - Events


  Last Shelter Guides:

The DD event adds occupying plots and cross state alliance duels.  You will be purchasing a lot of stone from the alliance store so be sure to keep the technology donations going.  The alliance members must donate stone to the buildings so the alliance centers can be built.  Every alliance member should collect as many stones as possible leading up to the event.   Each member will need to contribute at least 15K stones to be able to build all 4 alliance centers.  This done through buildings in the alliance menu.   The donate button at the top.  Hopefully, you will have enough stone to place all the alliance buildings as soon as the event starts.

Purchasing the doomsday investment benefit gives you boost of composite materials, bonus tickets, and one free specialty reset per week.

Stone Requirements:
  • Alliance Center 1 - 1,000 Stones 
  • Alliance Center 2 - 200,000 Stones 
  • Alliance Center 3 - 400,000 Stones  
  • Alliance Center 4 - 800,000 Stones
You can demolish an alliance center any time outside of a duel.    You recover 50% of the stones needed to build the alliance center and all honor buildings are recalled.

Event Concept


The concept is to occupy tiles working toward resources and abandon low level plots for higher ones.   You can only occupy adjacent tiles occupied by your alliance or next to honor structures.  You must take at least one tile at each level, similar to zombies.  Always work in the direction of higher level tiles.   The first war can be declared a week after the start of the event.  You should leave 5 - 10 tiles open in both your and foreign state to be used during DD wars.

Occupying a tile cost 10 durability and receives season points based on the level.  Fighters are the slowest units but they are the cheapest to heal and provide the most destructive power.   The destructive power is important when taking occupied tiles from someone.   Occupied tiles have 500 durability and an all fighter APC can take the tile with one hit.  

The immunity of a tile is based on your virus lab levels and specialty point allocation.      If this is greater than zero then your troops will get infected by the percentage given and require healing.    It is best to only hit tiles with a 0% and work on upgrading your virus labs.    The immunity percentage will decrease your troop power and if the remaining troops fall blow the guardian power then you will fail to occupy the tile.   It should also be noted that the guardian power increases in later season of doomsday.   The difference between season 1 guardian power and season 2 is ten fold.    You can garrison tiles occupied by your alliance.    This increases the guardian power of the tile.

  • White tiles are occupied by another alliance in your state.   
  • Blue tiles are occupied by your alliance.   
  • Green tiles are occupied by you.
  • Purple tiles are occupied by another state.

Resources in occupied territory provide contaminated resources that must be harvested at least once a day.   Processed resources are added to your warehouses.    Save your APC durability to use on occupying tiles and war. How much you harvest and influence is determined by how many resource tiles you occupy and the level of those tiles.   The amount of cash you get is based on your influence rank in your state.

The Adjudicator is also available on the map for rallies likes you do for Wendels.   You can rally one Wendel and one Adjudicator every day.    The Adjudicator rewards are specific to the Dooms Day event.

You can reset your specialty to blue to the left related to immunity boost to allow you to take higher tiles than your immunity lab levels allow alone.

Honor Structures


Once you reach a resource tile, abandon lower level or empty tiles and repeat.      You must upgrade your immunity labs to get higher level tiles and the processing plant to increase the capacity and processing speed.  You will need composite material to upgrade the processing plant which is gained from processing fuel and mineral.   Virus samples are used to upgrade the virus lab which come from processing water, food, and wood.  You get a set of honor structures for each of the four alliance centers.   There's four buildings placed at the alliance center 1 (Processing Plant, Virus Research Lab, Guardian Fortress, and Special Operations [Assault Fortress])   The other alliance centers have two buildings: Processing Plant and Virus Research Lab.   

You can place additional fortresses by unlocking them in the specialties.   Once these buildings are placed you can reset your specialty.     The fortress buildings are important.     The garrison fortress will increase your APC resistance in taking tiles and defending buildings.    The assault fortress will increase your APC might.   The more fortress you place and the higher the level the less infected troops you will have from taking tiles.    They will also boost your power when garrison buildings or tiles.

Buildings require stone to be placed on the map.   The stone cost increases for each alliance center and by the distance away from the alliance center.    They can only be placed next to other buildings, but they can be moved once placed.   (Tap on building, then View and relocate)     The building will need to be repaired if it is moved and can't be moved again until it has been repaired.

The first step is to upgrade your processing plants as quickly as possible.    These buildings are cheaper to upgrade and will allow you to process the resources quicker to get the large amount of virus samples you will need to upgrade your virus labs.  You will accumulate honor points and stone for taking tiles.  Honor points are used to open buffs under specialty.    I usually work on buffs under Construction specialty only related to processing speed and additional processing queues.    The more resources you can process the faster you can upgrade your honor structures.  However, you can reset these specialties to focus on other task.

Strategy


A week after the DD start there will be an option for declaring war on another alliance.   The target can be an alliance in another state or in your home state.   You can only select specific alliances that are 5 ranks below or above you.  Once war is declared and executed there is a cool down period of 20 hours.   The duel time is controlled by the truce timer set by the R5/R4.  The times are reset, reset + 8 hours, and reset + 16 hours.  You can only change the truce timer once every 7 days.   The other option is the "Find Opponent" button   This will select the first available alliance open for a duel.    This can be devastating to small alliance because it allows high ranking alliances to declare on smaller alliances.

If your alliance is not powerful then you should declare on an alliance quickly to avoid a larger alliance declaring on you.  By power, I'm referring to how many of your players have T9 troops. Many alliances are willing to deals on duels where one alliance will win to exchange points without major damage to buildings.  

The goal of war is to occupy enemy territory and destroying buildings during a duel.  You will get a bonus for destroying the enemy alliance center.    The event is based on points earned for those actions with more points awarded for higher level tiles and buildings.   A bonus is given for taking each enemy alliance center.  The most difficult task is to coordinate your members.

Each alliance is given a limited number of DoomsDay missiles.   DD missiles can not be intercepted by anti-missiles and instantly zero any base.    These should be used sparingly and only to turn the tide of the duel.   If you have an arranged duel then the missiles can be used against any base adjacent to your tiles.

Unfortunately, once the enemy is at the honor structures around the alliance center the chances of loss is almost certain.   Your only defense is to garrison buildings and try to remove their connecting tiles before they destroy the building.   Losing the war becomes greater the closer to the alliance center they get.  At this point, it becomes a race for points and this is where most of the individual losses occur due to garrisoning the honor structures and alliance center.    The highest rank alliances are often the ones with the greatest amount of participation and not the power of their members.


The best strategy is to keep them away from the alliance center as long as possible.   I recommend avoiding a direct confrontation with their troops unless you are certain your members are more powerful than theirs.

Most alliances favor building their alliance center in a corner of the map.   Generally, alliances put everything into protecting their first alliance center and neglect the others.   The reason for this is the enemy must take your AC1 first before they can place rally points close to your other alliance centers.    Often, alliances will tile in your state to get close to your undefended ACs to set up an easy win for their next duel.

The first transport to a rally point is free during the duel and are limited to the area around the rally point so it doesn't matter where the alliance centers are on the map. (Transports are not free if you duel an alliance within your home state.)  A solid defense strategy and member participation is more important than location.    If you are not integrating the defenses of your alliance centers by placing them as close together as possible then make sure they are randomly distributed on the map.   Often it is easy to find alliance centers because they build #1 in the corner and the others are built in a straight line between #1 and the launch center.

During the war, everyone should be attacking enemy occupied territory and repairing damaged honor structures.   Any members who can't participate in the duel should concentrate in taking back all enemy occupied territory after duel.    All enemy tiles should be cleared from your state so that state members have plenty of tiles for their use and the tiles can't be used in later duels to attack undefended alliance centers.


There are several specialties in the red (combat) that are useful for destroying and defending buildings.    

Specialty Points


The specialty points you use depends on what your goals are.     There are three main branches that I personally use on a regular basis.   I focus on these specialties because resets cost money.   You get a free weekly reset with the DoomsDay investment.   Additional weekly resets cost $10.    If you need more resets then you must buy a legendary pack at $99.

Immunity: (Left side of Construction) This gives you a boost to your immunity level additional to the immunity labs.   The lower branch increases healing speed and lowers healing cost.


Processing Queues:   (Right side of Construction) This specialty will give you additional processing Queues for processing resources and increase your processing speed and amount.


Honor bonus:    (Left of Resource) This gives you bonus in honor points when upgrading buildings as well as a random award once a day.

The lower right of the the resource will give you bonus boost while taking tiles.   In addition, there are two skills of interest.    The first skill allows you to temporarily boost the RSS you get from surrounding tiles.    The last skill allows you to increase the level of tiles you occupy.


My method is to use the immunity boost to get as many high level tiles as possible.    I switch to processing queues once I have all the tiles I can get.    This allows you to process the harvested resources quickly.     I stay on this specialty until I have a large amount of composite and virus samples.      The more buildings you can upgrade the more bonus you can get.   I try to have a minimum of 7 upgrades since this will usually get you an additional specialty point.

Finally, I reset to honor bonus on CoZ build day then activate a honor bonus ticket, CoZ Bonus Ticket, and the specialty skills.   This will give you a 290% honor bonus.    I complete as many honor building upgrades as possible while the bonus are active.    This should give points for CoZ and increase your specialty points quickly.

The honor bonus is based on the level of the building.     It isn't worth using the skill until your buildings are higher than 12.     You will get a new specialty point for roughly every 7-8 building upgrades.

Hero Experience: (Top of Resource) Another useful branch is the top of the resource branch.   This increases your hero experience and provides two skills.    One skill allows APC training at occupied tiles with no damage and the second gives you 100% resource protection during a siege which is useful for KE events.


Duel Scoring


After the duel, 20% of the losing alliance points are awarded to the winner and deducted from the loser. The points earned during the duel are added to the total points of the alliance then the rewards are calculated.    Keep in mind that earned points are converted and are not 1:1.

For Example, assume the two alliance start with the following points:

Alliance 1 (A1) : Points 100
Alliance 2 (A2) : Points 100

If A1 wins the duel the points are awarded:

A1 Points: 120
A2 Points: 80

Remember, you do not get points for any actions taken during the preparation phase of a duel which last 30 minutes after war is declared.    The battle phase will last 2 hours unless one alliance destroys all the alliance centers of the other.    It cost 10 durability to take tiles and attack buildings.

Member Scoring


Season: These are points from occupying tiles in the world.   These points are converted directly to your total score 1:1.

Declaration: This is points from occupying enemy plots and destroying buildings.  These points are converted 1:100 to your total score.

Stone Donation:   This is just points obtained by your stone donation to the alliance.   The points are converted 1:10 to your total score.


Alliance Center
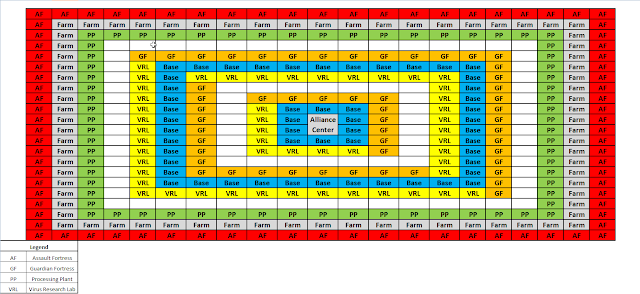


 Grid


The map set up around the alliance center should be in a checker board pattern extending out at least 200km in all directions using farms.  (This distance should be extended in later DD seasons.)   The main alliance should have tiles on the outside edge of the grid to make attacks on the enemy rally point easier.

The honor buildings around the alliance center should be in single rows with an empty row between. Farm accounts should be in the outside ring of the defense with the alliance defenders forming an inner ring.    The farm alliances will be used to block incoming enemy paths and force the enemy to use missiles to make a hole.       The alliance bases are the last line of defense for the alliance center.   They will block the incoming paths and garrison honor buildings as needed.

The farm alliance alliance center and buildings should be on the outside of your tile grid in a long line multiple buildings deep.    You can attack any buildings with your tiles adjacent too, but any attacks outside of a duel will cost double the durability.   This means the enemy will spend a lot of precious durability just to get through your farm alliance.


You don't want a gap anywhere near your alliance center big enough for a rally point (6 tiles).     The bigger the area you can create around your alliance center the better.    The goal is to force the enemy to rally far away from your alliance center so they use up most of their durability before getting to your alliance center.   

The bases defending your alliance center should be as close as possible to the action.    You can't use acceleration speed ups when attacking tiles or builds.    They can be used when attacking the alliance center.     Often, the winner is determined by the number of participants and travel time.     The more participants you have the more durability you have available.   


Honor Structures


The second part of the plan is to protect the alliance center if the enemy gets to the area.   An effective layout of your honor structures is to surround the launch center in rings working out from the center.  The Assault Fortress is the best building to be on the outside followed by the garrison.   Those buildings are harder to destroy than the other two.    Remember, all honor structures can be garrisoned by any alliance member.      

If you build in a corner then modify the layout to cover to the edges of the map.   Your Virus lab and processing plant are the weakest and should be at the back or well protected.  The area between the parameters should be left open.     All the other bases should be on the outside ring.   Don't forget that any base under level 19 maybe hit by missiles to clear a path for the enemy advance although it takes 30 minutes for ruins to clear.

The idea is you occupy tiles in front of the enemy path forcing them to go around.    There is a cool down period once you occupy a tile.     This can give you precious moments to take back tiles from their path to delay their advance.

Alliance Member Task


The most important factor is coordination of your members.    Everyone should be divided into smaller groups for specific functions.    You will want to be able to have multiple waves.   For example, Team 1 starts making a path to the enemy AC.     Team 2 will take over the task once Team 1 runs out of durability.

If there is a free-for-all you will have everyone using up their durability and wasting it on the same buildings.    It's not necessary for 20 members to attack the same honor building or one tile.

Defenders

This group will form a wall of bases around the alliance center and should be B19 or higher.    In DD, bases can not be directly attacked by an APC's but can be attacked by a missile.    If you form a solid wall of bases the enemy will not be able to take adjacent tiles because they can't attack your base.    This will force them to go around your base while constantly being harassed by the Blockers.

If the enemy gets to your honor structures then the Defenders should garrison the honor structures to prevent them from being damaged.

Blockers

Their job will be to occupy any territory in the path of the enemy occupation.   Tiles have a cool down timer after being occupied giving 5 minutes where the tiles can't be touched by anyone.    Tiles in the process of being abandoned can be attacked.   You can camp an APC on an occupied territory forcing the enemy to defeat you first.

Doing this will force the enemy to constantly go around the tiles.   This is one of the most important tactics because it runs down the enemy durability.

Guardian

This will be a small group of players who's purpose will be to attack the rally point of the enemy.   They should be near any ambush point ready to attack the rally point.    Destroying the rally point gives you a major boost in points and can stop the enemy cold.


Enemy State


Lone Wolf

At least one person should go to the enemy state with the simple goal of occupying territory.    Their job is just to occupy territory as deep as possible in the enemy state.     Every player will get enormous rewards if they fill their occupied territory in the home and enemy state.    The only chance you get to occupy a foreign state is from a rally point.    So while the attackers do their job the lone wolf must go as far as they can.    All alliance members will later use these tiles to expand their own holdings in state territory.   These tiles can also be used to sneak up on enemy alliance centers in later duels.

Attackers

This will be the group that goes to the enemy state to attack the alliance center and support buildings.   Make sure you don't weaken the defense of your own state by a majority of players going to the enemy state.  The goal is to get to the alliance center as soon as possible.    This group should be divided into two task.    The first group's goal is to destroy as many support buildings as possible. This will make up the majority of your attacking group and will confuse the enemy especially if they are not taking direct lines to the alliance center.   The second group's goal is to take the shortest path to the alliance center.

If the alliance is big and taking the alliance center is not possible then concentrate on damaging as many honor buildings as possible.     The winner is determined by the number of points accumulated which is totaled by the buildings destroyed (including their level) and territory occupied.

The exact strategy will depend on how the enemy has set up their map.  Remember, wounded troops cost to heal so avoid as much direct conflict as possible.


Destroyer Missile


Starting in season 2, you can build a destroyer missile from the alliance build menu.    You can build one every 24 hours at a cost of 100k stone.     The alliance guardian is the only one who can fire the missile from up to 500km away.     The activation of the missile is announced in state chat and takes 5 minutes to prepare.    During this time anyone in the state can attack the guardian.    If the guardian is reset (base durability at zero) then the missile is cancelled.

When the missile is hits the target area it clears everything from the map in a 5X5 area including tiles (Even if in protection), bases, zombies, and resource plots.    This is enough to place a rally point and 3 bases.     The enemy can't teleport to the area or take the tiles.

A solid strategy for the attacker is to take all the tiles between the area and honor buildings.   The rally point should be demolished as soon as this is done.      

The defenders should take all the tiles between the destroyer and their honor structures.    The tiles in the area will be cleared but the attacker won't be able to take the tiles in protection once they port in and it will allow you to immediately send DD missiles.


Legion


Starting in Season 3, each alliance center can have a legion.   The R5 or Overseerer (R4) can appoint a legion master for each center.    Alliance members can send their APC to the legion at any of the 4 centers by clicking on the alliance center then "Send to Legion".     The main draw back is the member must have available tiles for both states and full APC durability.    The legion master can not abandon tiles and the apc does not regenerate in the legion.   (Although the APC regenerates at the normal rate for the owner.)   The legion master can dismiss an APC from the legion which then returns to the owner.    The APC owner can teleport to other states without their APC being removed from legion.    However, they must be in the home state to send to legion.

The legion can only be used to take tiles in both states.   It can't be used to attack buildings.   The legion power is a sum of all the APC's in the legion and the speed is always constant regardless of the types of units in the APCs.   

A new building "Garrison Building" is available on the build menu in the world map for the legion master.     It can only be placed next to adjacent friendly tiles or on top of existing alliance tiles in a 3X3 area.  It takes 5 minutes to build once placed.   Members can use the Garrison building as an adjacent tile when occupying tiles.   This building can be garrisoned for defense and legions assigned to it.     It can be attacked by anyone in the state with adjacent tiles.   You can not send a legion to a garrison in another state without first sending to a rally point in that state.  Once the building is destroyed it is is remove from the map.

The legion master adds available APC to the legion then sends it to any garrison building in the home state or rally point in the other state.    Once the legion arrives at the destination, the legion master can send it to take 5 tiles.      The targeted tiles do not have to be adjacent to each other but they must be adjacent to friendly tiles.   The legion master must be in the state where the legion is located to command it or send it to a different base.

The speed is comparable to fighters.     The legion will return to base if one of the target tiles is in protection or it completes the assigned tiles.


Rewards


The final rewards are the best in the game and are based on your alliance rank at the end of the season.  The R5 automatically gets the leadership reward which is the most generous.     This is followed by 9 core rewards and 90 main rewards.    These 99 gifts are sent by the R5 to the alliance members.

The rewards can only be sent to members who have earned a minimum of 10,000 points.  Every member can reach the minimum points by taking tiles and upgrading honor buildings alone over the season.

Saturday, May 9, 2020

Last Shelter: Players Guide - Events

State Events

  Last Shelter Guides:


 State Events


The state events run every week for 4 weeks then a break for a week with a warm up event.  The first state wide events start in about a month beginning with the launch center battle. The exact timing of the events often changes at the developer whims.  Its important for all the alliances in the state to come together to compete against the other states. The states that don't come together for the state versus state (SVS) event will lose the events and end up missing out on a lot of free resources.


Event Schedule


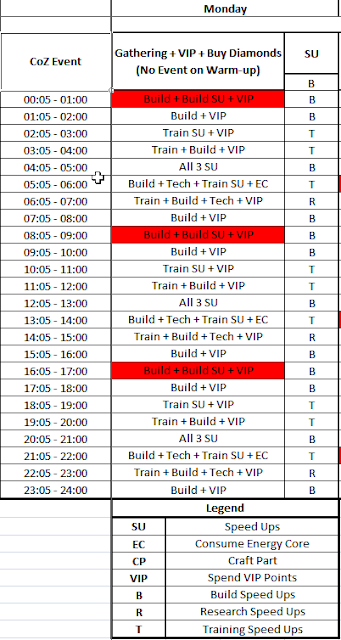
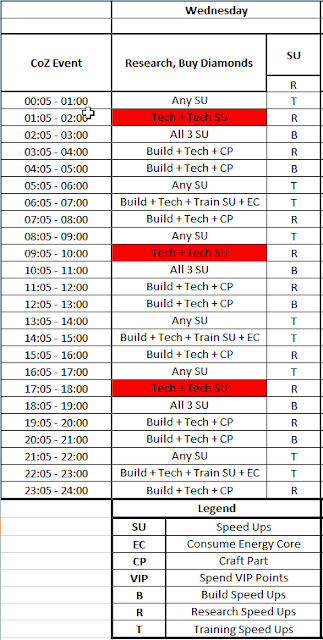
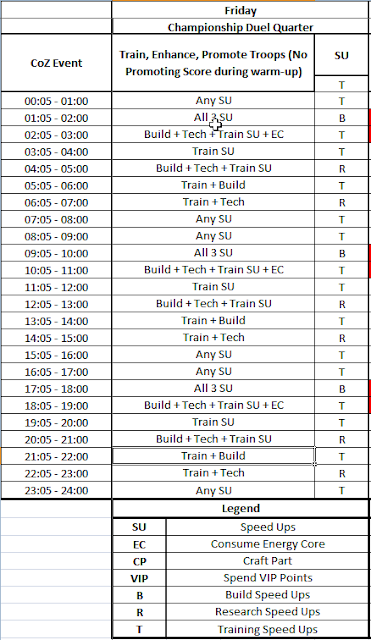
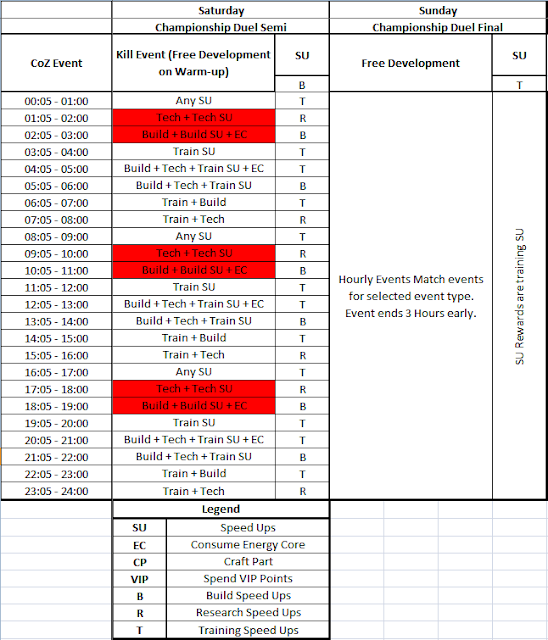
The best method is to figure out which hourly event works best for you then activate a bonus ticket and work on the CoZ event.    The 3rd, 6th, and 9th CoZ event boxes provide the best rewards.    You should stop at each of those points if you don't have enough to get to the next and save your resources for the next week.   You're unlikely to make the next box if you can't max out your points in the 30 minute duration of the bonus ticket.  It's common for people to use up all their bonus tickets chasing the 3rd or 6th box.

On the "warm up" event week, there isn't an event on Monday and no kill event on the weekends.  The warm up event also doesn't give points for promoting troops on training day.

The Clash of the Zones (COZ) events start a month after SVS and require more corporation since other state players will be able to come to your state to attack on the weekends.    This requires coordination between the alliances to defend your state and attack the other.

If the state doesn't get it's act together by the dooms day (DD) event then you should start looking for a state to immigrate too or start a new game.    DD includes all the previous activities but adds additional events for tiles and war.

Completing the Zone Commemoration technology branch is the only way to do well in the state events, but researching this branch will require large amounts of courage medals.

If your alliance does well in the event then the alliance prizes will provide bonus tickets.   The 50% tickets can be combined to 100% in a 4:1 ratio.    If you time your events right you can use the ticket to maximize your score.

You can win events by saving up resources, speed ups, and items for the specific event.   Completing an hourly event provide additional speed ups.    If possible stop after maxing out the score for the hourly event and continue once another hourly event starts.


    Monday: Gathering 


    The points are earned by gathering from resource plots on the world map.   You can also earn points by purchasing diamonds and spending VIP Points.   The resources have different gathering speeds so they all earn the same amount of points.   You should get a gathering bonus from the alliance store.   Diamond gathering is extremely slow and doesn't benefit from gathering bonus so you get less points than the other 4 resources.

    There's always a chance someone will "tile hit" if you are gathering for free development.  You should gather at least 100K away from your base and away from any other bases.  

    Tuesday: Building


    Points are earned by upgrading buildings, purchasing diamonds, crafting APC parts, or consuming energy cores.  You get points for every level you upgrade.   For example, upgrading a building from level 5 to 6 will give you 6X the points in the event.   It is best to plan major upgrades to finish after the event starts (Like your base) then complete smaller ones during the event.  Don't focus on upgrading warehouses if you are above level 10 since you get less points due to the level.

    Wednesday: Research


    This event points are earned by researching technology or purchasing diamonds. The points are also awarded based on the location in the tree and level.   Again, start research before the event starts so that it will finish after the event starts.

    Thursday: Hero Development


    This event points are from gaining hero experience, Exchanging/Spending Wisdom Medals, Unlocking Skills, Using Recruitment Tickets, and killing zombies on the world map.   Start the event by using your recruitment tickets then split and exchange all the green heros.     You can split blue and purple heros you don't need.  Don't exchange the medals for purple or blue because you will need these to unlock hero skills.

    It is possible to use hero splitting to maximize your rewards.   This usually involves a green or blue hero.  First, you upgrade the first skill to max then split the hero.     You will lose about 20% of your wisdom medals and money with each split.  It usually takes 3-4 heros to obtain the third box.   Don't use this method because wisdom medals are more valuable than rewards you get.  It is better to use your wisdom medals to upgrade hero skills.

    This is the best event for your farm alliance to boost your state score.

    Friday: Training


    The event points are from training, promoting, or enhancing troops.   The higher the level units and count the faster you will earn points.   You get more points from training new troops than promoting or enhancing.

    During COZ, it's ok to to train vast amounts of troops.    Eventually, their consumption will outpace your ability to keep the ration truck full.   This is not a big problem but it will impact your cash generation ability.   The major goal is most of these troops will be killed during the kill event which will balance your base.

    You can get a jump on the event by training units the day before and not collecting them till the start of the training event with an active COZ bonus.

    Saturday: Kill Event


    The kill event is the most dreaded and expensive event.    You should only attack lower level bases to minimize your casualties and watch out for bigger players.   If you have good technology then you can attack bases with the same level as you.   Points are given from units level and number killed whether they die as a result of an attack or defense.

    You will lose more than you gain if you end up healing the majority of your units.  This is also true of "Camp hitting".  Sometimes other alliance members will offer to trade hits on camps to complete the event.    This will end up being more costly than gains from the rewards.

    The event requirements are high and you will need a large supply of transports to find enemies.  Before the event starts, stock up on advanced/random transports, shields, attack/defense bonus, and anti-scouts.  You should also start as many upgrades, research, and refill buildings before you start to minimize losses if you are attacked.

    Transport to the mud (brown) around the launch center to drop your shield without the cool down if you are shielded.  Find a location to put your base with the most obstacles around it to minimize an enemy from transporting adjacent to your base.    If you see the flash of a base transport you should immediately transport 15-30k away to avoid being hit.

    Keep an eye on the state chat and news flashes for your name.   Some will attack those who appear in the news feed or shared coordinates.    The best strategy is to send all your APC to attack once you port in then use a random or advance teleport to move to another spot.   The random teleport can't be used if you have APC or scouts out.   It also can't be used if your base is currently under attack.

    Be extra cautious when you see a small base attacking.    People use their farms as bait and they attack unshielded bases.   Many will port in to attack the smaller base thinking it will be easy points then suddenly you have a B25 next to you after your APCs return from the first hit.   One of the signs of this is the small base will not run when you port next to them.     You can use an advance teleport while your APCs are out of your base so if they stick around then it's probably a trap.

    Dodging Attacks

    You can dodge an enemy attack by transporting your base to another location.    Always watch state chat for someone sharing your cords and spaces around your base where someone might transport.   When your position is compromised then quickly move at least 30k away and transport your base to that space.    You're APCs will be recalled and transported with your base.    You can only use an advance teleport to do this.    A random teleport can not be used when you are scouting, being attacked, or attacking someone.    Your destination could be a bookmark, back home, or just a random spot away from the attacker.

    If the attacking base is similar in power then optionally transport to a different tile next to their base and launch a fresh attack against them.   The goal is to hit them while all their troops are out.

    Try to find locations where there is no space for someone to port next to you when looking for a place to attack.     The farther away they are the more warning you will have of their attack.    It's nearly impossible to dodge an attack when they are right next to your base.

    Baiting

    You can use a farm account as bait.    Attack bases and wait for their members to port in.    Then you port in with your main base and attack them.      This is very effective as a farm probably won't attract the large base 25's.   It's a little hard to accomplish because it requires good timing.     You need to port in just as their troops are turning so they will be in the base as your APC reach their base.

    You can also use your main base as bait.    First, port into a large hive and attack all the bases around you with your two weakest APC.    Eventually someone will port in next to you to defend the hive.   At that point, you're largest APCs will still be in your base to defend.     Once their APCs are returning then you can launch a counter attack.   This is a risky move because the attacker could have more powerful APC than you.

    Sunday: Free Development 


    This allows you to select a repeat of the previous events.   I usually opt for gathering but this can be dangerous when the kill events are going on.   You should select which ever will benefit you the most.


    Bad Kill Event Strategies


    One common strategies is a "purge" prior to the kill event.    This is bad for moral and team cohesion even if ordered by the state president.  (Bad for power ranking too)     Think of a player who has spent the last month helping build the alliance.     A command to shield is given but due to life events, lack of diamond, etc they do not shield.    If they are kicked (and often zero'd by their own alliance) they will log in feeling betrayed and a grudge towards the alliance.    Their friends will see or even participate in the attack which makes the betrayal worse and leaving everyone wondering who will be next.  They usually join a different alliance afterwards.   Remember, people put in a lot of time and money into this game so everything in the game becomes a personal attack.  The one doing the purge will also have great expenses in diamonds and advanced transports which means less for the kill event.    They will also pay a lot in units and resources if they are not several levels above the one being purged.    Why do you have low level players in your alliance anyway?   The purge isn't even done during the kill event where it would provide points for your state.

    In my first state, the president decreed that every alliance kick and purge members who didn't shield on Thursday before KE. (24 hours before the event)   The president would zero alliances who didn't comply with the order.    Under this threat, I participated in the purge of my alliance.     It was extremely costly to our members and prevented us from participating in KE.    After the purge, the victims of the purge felt betrayed.  Some quit the game or joined other alliances even though those alliances also performed the purge.    Our alliance had a drastic drop in rank and were unable to participate in KE.   All it accomplished was firmly setting the top 3 alliances in their rank since we all did their dirty work for them.   The top 3 benefited from the purge because they all were more advanced.

    In the end, the many of the alliances began to collaborate with enemy states to destroy the president's alliance.   It was entertaining to watch but we lost every event afterwards from a combination of collaboration, quits, or boycott.

    The state became a ghost town from the number of people who quit or immigrated out.  Even after a year, the state is still mostly empty.   I eventually immigrated my base to my second state.   When I left, there was only one partial alliance left who lost every event.

    I started over in another state.   Again, the new president's alliance ran a purge prior to KE.   Like before, this destroyed the moral of the state.    Most alliances couldn't or refused to participate in events afterwards.   I eventually quit the game as well.    I came back after an 8 month hiatus hoping the game had been balanced by the developers.  There have been some improvements but the game is still pay-to-win.

    It should be common sense but I have seen these strategies used in every state I've played.    The opposition is always silenced and the strategies are implemented.   These failed strategies are stopped after the massive losses are realized; often too late.


    The reason why a purge doesn't work is because you would have to kill 100% of their units to prevent the enemy from getting points from attacks.   The purge may put most of their troops in the hospital but it still leaves plenty available for points.     Even if all the troops are in the hospital, an attack will gain points until all the units are dead.    It also depletes the resources of everyone making the state weaker. Bases are often zero'd because people are trying to maximize their points.   During KE, unprotected bases get hit repeatedly after their durability recovers.

    Most enemy points are from people who participate in KE and get hit by a bigger player.    Everyone who has done a KE has attacked a hive when a Base 25 ports next to them and wipes out all their units.    It's simple math.    An inactive B16 with 30K T5's won't give as many points as an over confident B19 with 100K T7 units and gets zerod 4 times by bigger players.     The majority of state points are not lost to unshielded bases.    The way to win KE is to attack bases where there's no question of victory and never being hit by someone bigger than you.  In my experience, people who don't shield for a kill event are usually not very active with under developed bases.

    The purge is always justified by saying it's "free points" for the enemy.   If you lose a KE event then the other state was either more powerful or your strategy was horrible.  Everything else is an excuse to avoid blame for the loss.    These events require coordination and team work.

    Good Kill Event Strategies


    Some players should stay in your state and defend other members.  This should be the biggest members.   You could even leave some members or farms unprotected as bait.  

    In all the KE events I participated in the most effective defensive strategies was where any attack  resulted in the location being shared on state chat.    A large base would transport next to the attacker and wipe out the base.    The only counter move is to quickly port somewhere else the moment you see the transport.

    Some say that sharing coordinates on state chat announces free points to the enemy.    How valuable is a base to the enemy that has been attacked multiple times?  Wasn't the purge supposed to eliminate those free points?

    The fact is that the enemy has been searching your state for the past week bookmarking every hive and solitary base.    The enemy will start hitting remote bases in all corners of the map after the first 12 hours of the event when most hives have been depleted.    I have personally spent hours searching over the map looking for bases to finish out my rewards.

    There should be two teams.     The offense team goes to the enemy state to attack.  The defensive team stays in the home state and should be ready to teleport anywhere in the state where the enemy is attacking.    Everyone else is further divided into two groups.   The first group announces locations of enemies in the home state in the state/alliance chat.   The second group should watch the enemy state and announce locations of targets in the enemy state.      The most important is someone should be responsible for coordinating across the alliances through an outside app like Line or discord.

    Another good strategy, is for everyone to wait in their home state and attack any enemies who port in.    This will deplete the enemy of durability, resources, and units.   When the attacks slow down then most players go to the enemy state to wage war.    This was actually used against a state I was in.    We all thought the state was inactive because no one was porting to our state.   Nearly everyone went to the enemy state for the free resources only to find they were active and waiting for us.     

    SVS


    It's best to have a rotating presidency between the alliances so the rewards are shared between everyone and a counsel to make rules for the state.    Sharing power means more alliances are likely to participate in events and reduces the burden for everyone.    The president should also give out the support packages to players who are active not just the biggest bases.

    Every state always seems end up with a dictator with every perk going to the ruling class.  The president always gives the perks (buffs) to their friends and/or the biggest players.  The president can also give (debuffs) which give a penalty to the players for a week.   
     

    Launch Center Battle


    The kill event opens with the launch center battle.   The area surrounding the launch center forces the APCs to move extremely slow and APC casualties simply die instead of going to the hospital. The biggest players are usually closest to the launch center.    The shield will drop on anyone who ports to the mud.  

    The enemy state can occupy your launch center when the CoZ event starts which means your state will not have the perks of the presidency or national quest.   They can also assign the debuffs to players in your state.

    The battle for the launch center outcome is mainly decided by APC power.    Some states will try to use farms to fill the mud area around the launch center.    The problem is these bases can be hit with missiles or zerod.    Under powered players will also quickly be zerod or run from the bigger players.  This opens gaps in the defense for enemy bases to port in.    The grid then becomes a liability for your defense to attack the enemy base.

    The best defense is for players to garrison the launch center while their alliance members on the green shield and reinforce those players.   

    Appointed Officials


    After the Launch Center battle, the winning alliance will appoint officials to eight positions.   The positions have different buffs and are associated with different departments of the national quest.    Appointed positions can't send an APC to work the national quest instead they get national quest experience from other state members working at their building.     Your experience gains is based on how many work at your building.

    Each appointed position should place cards at their building as soon as the new work day starts.  The cards are to attract players to your building. 

    The first two cards are placed from your personal cards for free.    Two additional cards can be placed by opening the card he wolf pendant.    These can be purchased from the stored with diamonds.    Each pendant cost 500 diamonds.     The first card will cost 1 pendant and the second card cost 3 pendants.     Officers will spend 2000 diamonds each day of the week.

    COZ Strategy


    The SVS strategy applies to COZ with the addition of cross state attacks.     Anyone who is not participating in the kill events should shield for the duration of the event.   Most presidents will negotiate some basic rules for the kill event such as no hitting gathering apcs or farms, but you shouldn't count on this.   Keep in mind that the enemy can see conversations in the state chat.   Newbies will try to flood state chat with meaningless chatter to prevent communication.

    The kill event begins 30 minutes after the launch center.   This is where players can teleport to the other state to attack the others launch center.        A "Ghost base" is left in your home state when you teleport to the enemy.    This base can be hit by missles.

    Sunday, February 23, 2020

    Last Shelter: Players Guide - Main Account

    Last Shelter: Player's Guide 

    Main Account


      Last Shelter Guides:


     Game Concepts


    Your main base will need a source outside itself for resources.  Upgrading your base is easy up to level 15 then the cost of upgrades become ridiculously expensive in terms of money and resources.   They raise exponentially as you go up into the 20's.

    Some players will purchase the extra resources while most will attack other players to gain extra resources in the first month of the state.   At first many people will start the game then get bored and leave.  This will leave abandoned bases through-out the state in various levels.    These accounts will eventually drop off the system for inactivity (2 weeks).

    Most alliances will create a farm alliance under their protection and you will need farm accounts or a deep wallet.    Look at my post on creating farms. You need to create farms accounts in the first few months while there are other bases available for farming so they are ready when there's few bases available.  Most alliances will agree on some sort of Non-Aggression Pact (NAP) but this still leaves a lot of bases for farming.

    Alliances


    You should watch the rankings of the alliances in the state (Menu > Rankings > Alliance Power Ranking)  and what the NAP is.     Join a top alliance as soon as possible otherwise your base will probably be farmed by everyone on a daily basis.  It's good to develop friendship with other alliance members but it's more important to stay inside NAP so you can grow.

    Once in the alliance, you should donate to alliance technology as often as possible.   However, don't throw all your diamonds at the donations.    If you have some extra then donate up to 10 times on each open alliance technology.     This will gain points you can redeem in the alliance store and alliance tech provides various boost.

    Commander

    The leader of the alliance.    They are responsible for mergers and make the final calls on rules and actions taken by the alliance.    They are usually the first point of contact for other alliances.  The burden of command is a terrible thing.    You must appear to always know the answer to problems (whether you do or not) and be fair to your members.    Your alliance members are the most important resource and you must demonstrate good leadership skills to gain the loyalty of your members.  Showing indecision or ignorance will not inspire leadership leading to your alliance having a quick turn over rate.

    Guardian

    This will usually be the strongest player in the alliance.   Their job is to protect the alliance from other alliances and players.   They are in charge of reinforcements and retaliations.

    Recruiter

    The job is the title.   This person should try to recruit new members and work on getting alliance mergers.  

    Overseer

    This person keeps alliance members in line with the rules of the alliance and state.   Often they handle all rank changes, announcements, and kicking of people for repeat violations.

    Diplomat

    This person handles all communications from other alliances.

    Aditional R4

    The remaining R4s assist the other appointed positions and serve as back up.


    Micro Transactions 


    This game is full of packages you can purchase.   Generally, the only packages that are worth buying are the Project Hero and Arms Supply.    Limit other purchases to small $5 or $10 packages and try to get them during state events if at all.   I recommend buying extra courage medals so you can finish the Zone Commemoration branch because the extra rewards gained will pay dividends during events.

    Larger packages provide limited value compared to cost and will go quickly.

    You can spend $800 for 100,000 diamonds and push a base from Level 3 up to Level 10 in a day.  You can achieve level 14 if you limit diamond use to complete upgrades when you have the resources for the upgrade.    Once above level 15, 100,000 diamonds won't be enough to complete one complete level of upgrades.   The purchases don't go far and that is why I don't recommend spending a large amount of money in the game unless you recently won the lottery.

    Payers(Pay to Win)


    This game is a pay to win.     Unfortunately, there is no amount of skill or strategy that will beat a player willing to swipe the card often.   It is nearly impossible to finish the zone com research or max heros without spending money.   It is even worse for the seasonal heros because the last 4 skills all require a duplicate medals.


    In every state there are players (or payers) who will spend money to upgrade their base quickly and dominate the state.   Typically, these players will try to control the state since few can match their purchased might.    These plays spend thousands of dollars from $7,000 to $20,000 USD.    These accounts are a poor investment and are sold for less than $1000.

    The game's rules and currency conversion is unfair.    The prices are based on the US dollar.  For example, If a currency is converted $1 to 7 Lira then people in Turkey will pay 40 Lira for something that cost $5 (4.50 UK Pound) in the USA.     However, the Yuan conversions are the opposite.    If something cost $5 then it will be 0.50 Yuan.      The game makes Chinese states (States for Mainline China players) that no one outside China can join or migrate to/from.    These become super states due to the artificially low prices and are matched against everyone else in events.   

     These states also get a head start of at least a minute on declaring in the Doomsday event.   This means you will have no choice if you are targeted by one of these super states.    These states also get cheats like being able to locate your base anywhere on the map even after using a random transport or dropping your shield.    The developers have denied the favoritism.   Many players have experienced these cheats and many people from these states have admitted to the abilities.


    Building Upgrades


    For bases below 10, concentrate on upgrading your base level and select Farmer class at level 7.    Keep your Research the first 7 technologies in the "Rapid Production" branch as soon as possible.    You can run rapid production on each resource plot each time it's upgraded.   This will give you a boost in resources.

    Don't build anything you don't need. eg: Architecture building.  Buildings you don't need should be moved off grid (disconnected from the road) including the garages.     You can move buildings off that you aren't currently using like the training camps.    This way they don't consume electricity when you don't need them.

    You should try to get to base 25 as soon as possible.   The event rewards increase with each base level and are best at level 25.

    You must build:

    Garrison (for 5 > 6)

    Buildings that must match the base level:

    3 > 4 - Windmill
    5 > 6 - Bank
    8 > 9 - Bunk
    9 > 10 - Hospital
    10 > 11 - Lumbermill
    11 > 12 - Farm
    12 > 13 - Lumbermill
    13 > 14 - Shooting Range
    14 > 15 - Bank
    15 > 16 - Embassy
    16 > 17 - Vehicle Factory/Garrison Hall
    17 > 18 - Farm
    18 > 19 - Power Plant
    18 > 19 - Bank
    19 > 21 - Water Filter

    Unit Levels

    Keep your Shooting Range and Vehicle factory up to your base level as you upgrade your base.    At certain levels a new unit is available, at these points you should upgrade all your units, resource structures, banks, and houses to your base level.

    • Level 10
    • Level 13
    • Level 16
    • Level 19
    • Level 22


    Raider and Other Class types


    I prefer to change to Raider at level 10 once I have upgrades all my units.  You can wait till level 13 if you prefer.   Farmer class generate a high level of resources and excel at gathering, but they do not generate a lot of money.    You can generally sell off extra resources for money so it's possible to stay as a farmer as long as you wish.      The problem is the farmer is not effective at combat due to penalties, but it does have a high resource protection level meaning raider can't take all of your resources.

    After the first launch center, you could pick the builder class because it helps base upgrades.   It's similar to the trader without the special building.

    The other class type is trader that doesn't have a combat penalty and generates a lot of money.    They don't generate a large amount of resources, but the trader can exchange money and diamonds for resources in the trading post similar to the commercial hub.

    Raiding other bases or your own farm accounts is the only way to consistently have enough resources to upgrade outside of purchasing resources with micro-transaction.   Unlike the other classes, you can always find another base or add another farm.

    Due to competition for resources, you will need to transport your base away from your alliance hive to raid successfully if you are not using farms.   The best place to raid is to be near several low lever alliances.    Most bases lower than level 9 are not worth the trip.   Always scout the base before you attack to make sure they have at least a full load of resources.

    The class APC as a raider is the only thing able to take cash from the target base.    The amount of case you can take is about 2.5% of the total capacity of your APC.   The amount of cash taken can be boosted by researching the Load Improvement (Class APC), Transport Improvement (Vehicle Training), and Carrying Capacity (Zone Commemoration).

    The APC barracks should be kept to your base level to maximize the unit capacity.    The more units you can put in an APC the more the capacity of the APC.   Other raider important buildings are the trap building and garrison (available at level 15).   These buildings should also be kept up to your base level.  The raider gets bonus from the trap building that others don't get making them more powerful on the map.


    Power


    Your power is determined in the following order:

    1. Technology
    2. Heros
    3. APC Parts
    4. Unit Level
    5. Buildings 
    A base with superior technology an heros can defeat units 1 -2 levels above theirs.

      Research


      Technology is the most important thing in the game and you should never compromise researching technology for buildings or events.  Lower level units can defeat up to 2 tiers above with superior technology.  Save as many of your speed ups as possible for use on advancing your research but don't use them until a daily or state event.

      Keep your institute building level with your base up until level 15.    The building provides a research boost at level 15 (Fast Research 75%).  The next boost doesn't come till level 20 so once the institute is at level 15 you won't need to worry about it until your base is at level 20.

      Your research should focus on the following trees:
      1. Base Development
      2. Class APC
      3. APC I
      4. Vehicle Training
      5. Shooter Training
      6. Basic Military
      7. Medical Advancements
      Other important Technologies:
      • Zone Commemoration -  This tree should be researched as much as possible once it becomes available.   This will boost your points during State Events.
      • Rapid Production - Don't research past Paradigm Shift until you have completed the 7 branches. 
      • Basic Combat - Don't research past Recycle Resources until after the 7 branches.
      Technologies for State Events:
      • Zone Commemoration
      • Shooter Training 
      • Fighter Training
      Zone Commemoration (Zone Com) requires courage medals to do the research.   The only way to get courage medals is to kill zombies in the early game and events.    The prizes from the state events will provide the most medals you will need so it's important to get as many boxes as possible.    Zone Com will make it easier to achieve boxes.  You can also buy packages with courage medals.   If you plan to spend money in the game then these packages provide the most value for your money.

        Heros


        Heros are the second most important thing in the game.   You should keep the Hero Hall up to your base level because this gives better hero experience bonus.  The best heros are in this order:

        1. Orange
        2. Purple
        3. Blue 
        4. Green
        Many of the heros provide some kind of economical value.  They can be station in most of the buildings and some provide boost like Nora's "Touch of Midas" which will provide a rapid production of food every 24 hours.     You should station as many hero as possible.

        Unlock and upgrade skills as needed to complete daily task but keep most of your resources for hourly or state events.    Unlock and upgrade the skills for your hero APC as often as possible to increase your offensive and defensive abilities.   Additionally, all the purple and orange heros have an "Awakening" skill and your goal should be to unlock this skill as soon as possible. The awakening is the most difficult to unlock because it requires a medal of the same hero.

        The military blue and green heros don't provide much value and should be split in order to exchange for wisdom medals.    Orange heros are the best and should never be exchanged for medals.  You should limit the number of blue and purple hero medals you exchange for wisdom medals because they are required to unlock skills of other hero.

        First, concentrate on upgrading the first skill of each hero in your APC.   This skill increases the number of units on the row the hero is stationed.   This will boost your APC power quickly.

        Arranging heros properly in your APC is the most important factor.  Pay close attention to the hero skills as some are specific to a type of unit.  eg: Shooters, vehicles, and fighters.     The second important skill attribute is the range.     The range is how farm they can attack which is calculated from their position in the APC forward.     A hero on the third row with a range of three will only be able to attack the first row of the enemy APC.

        6 of the purple heros have a link ability which means they get additional bonus when in the same APC.   The best defensive configuration in your All Shooter APC is the "Gun for Hire: Selina", "Gonzalex: The Veteran", and "Bart the Professional".

        There are many factors the heros control in your APC.   Keep in mind this is a general outline and not all heros have the same type of skills.    You should read each skill when considering configuration.  Skills can affect the APC and Row.    The skills can be specific as to impact your (Friendly) APC or the enemy APC.

        APC parts affect all of the attributes which depends on the part level and the part types being applied. 

        • Troop Load - The primary skills are the first and sixth skill.   (Your barracks level also contributes)  This is used to calculate the damage done and a higher count will delay the formation collapsing due to low moral.
        • Might - This is the damage done by your APC.   The primary skills are 4, 6, and 7.   The war rooms impact this for APC with all the same type of units.  The trap house (Raider Class only) also affects this.
        • Resistance - This is affects the damage taken by your APC.  The primary skills: 3, 6, and 7. The war rooms impact this for APC with all the same type of units.  The trap house (Raider Class only) also affects this.
        • Tactical Might - This is the damage done by the hero skills. 
        • Tactical Resistance - This is affects the damage taken from the enemy hero skills.   The Garrison hall affects this value.
        • Hit Point (HP) - This is the amount of damage that can be taken by your APC.   Skills: 6 and 7
        • Combat Speed -  This determines who gets the first attack.
        • Marching Speed - This is how fast your APC travels in the world map.


        APC Parts

        You should produce parts specific for the purpose of the APC.    Ranger Parts for an all shooter APC, Phanton parts for an all vehicle APC, and Trail blazer parts for the APC while you are gathering.    

        Work on upgrading your parts factory to at least level 5 when it's available at base level 16.   You need to work on upgrading the factory and research parts technology with the goal to max both as soon as possible.  

        The quickest way to get orange and eventually gold parts without spending large amounts of money is to produce green "Common" materials (available by the part technology).    The method I use is to produce enough materials to make 16 blue parts.     This will require 16 green materials for each blue material needed to produce the target part.    Save all the materials and make the blue parts on the CoZ build event.    Finally, combine the completed parts from Blue to Purple to Orange.

        It is quicker to complete 16 blue parts even though the resource cost is about the same for making 16 blue materials or 1 gold material.   You will end up spending more diamonds for speed ups to make gold materials.   

        It takes 256 green materials to make one orange material and each green material cost 960 diamonds for an 8 hour speed up.   One blue part will cost 16 green materials and 700 diamonds (Finish Now) and about 800 energy cores.

        I always work on getting orange parts for my APC before working toward getting gold.   You can use "Any Speed up" hourly events to hurry material production and buy extra materials from the commercial hub and exchange for energy fragments.


        APCs


        Typically, your class APC should be full of vehicles and APC I should be full of shooters.  The reason for this is vehicles are faster and are able to carry more resources.  This will increase as you research the Vehicle branch.  Use the class APC when gathering or raiding other bases.   APC I should stay inside your base at all times unless you are shielded.    This is to defend your base against raids.

        Vehicles are weakest against shooters and most experienced players will use an APC full of vehicles to raid so an all shooter APC is the most logical choice.    APCs with the same type of unit will get bonuses at level 18 with the war rooms.

        At base 18 you will get a fourth APC.      The exact configuration depends on your situation and your enemies.   You can fill the other APCs with a mix or specific types.   At this point, you can train enough troops to fill the 4th APC with different configurations so you can respond to different situations.

        There is no reason to train vast amounts of troops over the capacity of your APC unless you want multiple configurations.  The general rule is have enough extra troops to replace the first row of your largest APC.    The more troops you train the more cost you will have to maintain those troops.  Don't worry about troop enhancements until you get to T7.

        Fill your APCS with T1 vehicles when gathering.    The T1 apcs are weak in battle but they can carry more, gather faster, and are cheaper to produce than more advanced vehicles.   Remember to swap them for more advanced units when you're done gathering.

        If you are going to participate in the battle for the launch center then you should fill one APC will all fighters.     Shooters are weakest against fighters and most experienced players will occupy the launch center with shooters.


        Gathering Station


        In the VIP shop (Level 2), you can get the gathering station.    This gives you a 5th APC used solely for gathering.    It's capacity is determined by the building level since it doesn't have units or heros.     You can equip it with Trail blazer parts which will increase it's capacity and gathering speed.

        This APC can't be used in combat and will be recalled if you transport your base.


        Friday, February 21, 2020

        Last Shelter: Player's Guide - Farms

        Farm Accounts

        Last Shelter Guides:


        In any state, your main base will need a source outside itself for resources.  Some will purchase the extra resources while most will attack other players to gain resources in the first month of the state.

        Many people will start the game then get bored and leave.  This will leave abandoned bases through-out the state in various levels.    These accounts will eventually drop off the system for inactivity (2 weeks for bases not in an alliance).   The drop off is a little longer if the base stays in an alliance.   After the first kill event there will be very few accounts for you to farm.

        Farm Concept

        A farm account is a base with the sole purpose of generating resources to be stolen by another account.

        You can create as many farm accounts as you want.    Generally, you will need a minimum of 4 farms to grow one base up to about level 18.    Beyond 18, you will need at least 2 additional farms for each level you go up.   This should allow you to level a base every week.   You can use the game on emulators like Memu and BlueStack which allow you to run multiple accounts at once on your PC. 

        The easiest method is to create a GMail account that is wordy.    ex: thisismyfarmemail@gmail.com     Google ignores periods and everything after a plus sign.     This allows you to create endless email accounts to bind to the account with one email address.

        These accounts will all be delivered to the original email:

        this.is.my.farm.email@gmail.com
        thisis.my.farm.email@gmail.com
        this.ismy.farm.email@gmail.com
        this.is.my.farmemail@gmail.com
        thisismyfarmemail+1@gmail.com

        You should level up the farm base as quickly as possible and ignore any buildings not specifically needed for generating resources.    Some buildings are required to upgrade the base level and can be moved off grid later (moving the building so it's not connected to a road) .

        All upgrades require the ration truck and one house to match the base level.     In addition, many building upgrades will require a specific population level which means you should keep the houses up to base level and the ration truck full.   I recommend upgrading all the banks as well since you will need money to keep the upgrade pace.


        You must build:

        Garrison (for 5 > 6)


        Buildings that must match the base level:

        3 > 4 - Windmill
        5 > 6 - Bank
        8 > 9 - Bunk
        9 > 10 - Hospital
        10 > 11 - Lumbermill
        11 > 12 - Farm
        12 > 13 - Lumbermill
        13 > 14 - Shooting Range
        14 > 15 - Bank

        After you start the account, do the minimum builds and upgrades to get to base level 6 as quick as possible.  You will be able to choose a class when you finish the base upgrade to level 6.   After the first launch center battle you can select the builder class.  You will need to send an apc to the national quest for at least a couple days.  (The apc only needs one unit to be functional and can have all T1) You want to max out the "Lifting Devices1" in the class manual.   This will give you free upgrades up to level 7 for most buildings.    You can get a base leveled to Base 7 in about 2 days with about an hour of work.   Most of those two days will be waiting for national quests and for resources to accumulate.

        Many people recommend using the farmer class for farms.     The only advantage is if you upgrade the production center to base level and log in every day to run the bountiful harvest.   The farmer is the best at gathering but it also has a high protection cap and doesn't generate money quickly.   The builder class reduces the resource needed for upgrades and provides free speed ups without the draw backs of the farmer.

        You should keep the farms, lumbermill, oil well, refinery, and wind mill upgraded with your base level.    You can slide on some of the levels while pushing base upgrades but you will need to level everything to base level eventually.

        It's not worth upgrading past level 15 on a farm in my opinion.    The cost of upgrades and maintenance are high and will reduce the amount of resources the base produces.   The time needed to finish the upgrades also  increases exponentially the higher you go.

        Don't place more than one building each for the hospital, bunk, barrack, and power station.   Once you reach level 7, you can move most of the unneeded buildings off the grid.  This includes the garrison, barracks, fighter camp, garages, and radar.  The more you can move off grid the less electricity you will need.

        Level 15

        Switch your class to trader and build the trading post once you reach base level 15.  You can supplement your resources by trading at the commercial hub and trading post using money and water.   Most people rarely log into their farm account, but you will need to log in at least once every week or two so the system doesn't drop the account due to inactivity.

        Make sure all the resource buildings (farms, lumbermill, oil well, refinery, and wind mill) and the Hero Hall match your base level.  You will also need to upgrade the institute to level 8 and fighter camp to level 2 to complete research trees.    You can place the warehouse II and 4th garage.

        You can upgrade the warehouse II buildings so the farm can store more resources.   This is useful once the kill event starts and your farm stays shielded.  

        Gathering


        You can upgrade your barracks and produce units to fill them if you intend to gather.   Don't worry about producing any units outside of T1 vehicles because they are faster and carry more. Don't build any units until you reach base level 15.  Farm gathering is somewhat useful to bulk up on specific resources for your main account.     If you don't gather then move the barracks, bunk, and hospital off the grid. 

        Personally, I don't find gathering in a farm account worth while.   The problem with gathering is you will need to spend a lot of resources upgrading barracks and producing units to be effective.  There will also be a lot of injured units every time your main base attacks which means you will also need to upgrade the hospitals.

        You can get extra resources from the Commercial Hub, Trading Post, and Rapid Production without the hassle of keeping your APC's full.


        Off Grid


        You can also move the ration truck off the grid.    This will reduce the population of the base.  This will result in a cash generation penalty.  The population is only needed for upgrading and the money production penalty won't impact the farm since you won't be building anything.

        It is important to make sure the farm has a constant supply of power. Resource generation gets a production penalty if the electricity falls to zero.  You can move enough buildings off grid so the windmill can supply all the power otherwise keep your power station going to supply extra power.

        Research

        The only research you will need in the beginning is the first 7 technologies in rapid production.   You can use rapid production to supplement your resources to keep the upgrades moving.

        Once you are done with your upgrades, complete the "base development" technology branch since it increases your storage capacity and resource production speed.      If you intend to gather, then research the "Load Improvement" and "Gathering speed" on each of your APCs.    You can finish the "Rapid production" branch if you  intend to do the rapid production daily.

        The other technologies won't provide much benefit for a farm.

        Heros


        You can place resource specific heros using the Station Management building.    There are several that will increase the production of certain resources.    This includes Pioneer: Nora, Lt. Joshua, The Sheriff: Gilbert, Resisteance Leader: Tony, Carpentar: Tony, The alchemist, and Accountant: Taylor.    You will have to upgrade the station management building to station heros.    In addition, most of them will need the skills unlocked and upgraded to provide any benefit.
         

        State Events


        The farm can easily participate in the hero development event. You can split all unused heros, especially combat heros, then use the medals for upgrading stationed hero skills.  

        You can use extra wisdom medals and split heros to max your score on Hero Development day.  Remember, you only get 80% of your resources (Money/Wisdom Medals) back from a split hero.   You can use this event to get diamonds for transports and shields.   You need about 700 wisdom medals to get third event box with splitting green heros.

        I only recommend doing this on your farms because the lost hero medals are not worth the diamonds in your main. 

        Here's a video on how to do the hero split and maximize your prizes:


        Use the Farm


        Uncheck all the APCs in the garrison so you don't lose units when you hit the farm with your main account.   However, attacks on the farm still puts units in the hospital.    I recommend attacking your farm to get resources and not simply try to trade.   Most alliances set up a separate alliance for farms which means you can't trade anyway.  I wouldn't bother trading since it requires you to upgrade the trading post and you will lose resources to the tax rate.

        Fill your attacking APC with T1 vehicles when you attack the farm.   Your heros and technology should compensate for the units being the same level.   You will be able to carry more and do less damage to the farm's durability.